Pi-Star Hotspot Help
This section will try and cover most common problems with setting up a Pi-Star hotspot or higher power gateway.
I have been using Pi-Star since 2016 for low powered Raspberry Pi based hotspots and higher power simplex gateways so have a good working knowledge of D-Star using legacy radios to the radios with DR mode. I have also calibrated units but this would be a separate topic. I have also configured units for DMR but again my primary interest and prefered mode is D-Star. At some point in the future I may add a section for troubleshooting DMR issues. DMR is less tolerant than D-Star when it comes down to the calibration of the radio board. I am not going to go through the complete configuration from the start as plenty of web sites cover this.
If you are connecting to your hotspot for the first time or you are not seeing it on your home network the Pi-Star Auto AP will create it's own access point. It's SSID will be Pi-Star-Setup and the password will be raspberry and you will be able to connect after about 3 minutes of it not connecting to your network if in a saved config file or in a wpa_supplicant.conf file. Connect to this as you would any wireless network, Once connected open your browser and to view the dashboard goto 192.168.50.1 or use the hostname, http://pi-star for Windows OS or http://pi-star.local for MAC or Linux based systems.
Note that the default Pi-Star hostname of pi-star can be changed if you are going to be using a couple of devices running Pi-Star. You will see that I have changed my Hostname of this unit to pi-star-hs, other instances of Pi-Star for higher power RF gateways have different host names. For example, I have the gateway callsigns as part of the hostname.
The image below shows the Admin page of a D-Star enabled hotspot. For D-Star only you can run either DStarRepeater or MMDVMHost, I have enabled MMDVMHost as occasionally I will change the mode enabled. The Service Status will show you which services are enabled and successfully running. The Mode Enabled, in this case D-Star, should be green and the Network Status with a good network connection should also be green. If this is not green the config will need to be checked. The Radio Info section will display your Tx/Rx frequencies, radio modem firmware version and also which mode is active should more than one mode be enabled. The D-Star Repeater section shows your local radio modem callsign info. If your Admin page has good info in all of the following sections it is more than likely a radio setting which will be looked at further down the page, click on the model to go to the relevant section.

If for any reason your hot spot is not enabled for D-Star within Admin > Configuration ensure that D-Star mode is enabled. If you need to make any changes in the next couple of sections click on Apply.

If for any reason your hot spot is not on the correct frequency within Admin > Configuration ensure that the frequency is set correct.

If for any reason your hot spot does not have the correct callsign, such as an additional letter added, correct it within Admin > Configuration to your licensed callsign. The port / node is set in the drop down menu. Whatever is here must be set in the radio in the eigth position.

If for any reason your hot spot is not connecting to your network ensure uPNP is set to On within Admin > Configuration.

If for any reason your hot spot does not connect to your network correct it within Admin > Configuration then Wireless Configuration. Click on Configure Wi-Fi.

Click on Configure WiFi and then Add Network. Once entered click on Save and Connect.

ID-51
If the hotspot is connected to your network and the services are running, callsign is correct the problem is more than likely with your radio. Below are screen shots from my radio that works with my hotspot. Rather than have text instructions I've uploaded these so you can easily follow them alongside your radio. This first section will look at your licensed callsign that you should have in the radio.


Ensure it is your callsign and not the hotspot callsign with a port letter in the My Call Sign field.

In the next section we will look at the entry for the hotspot.


I store my hotspots and gateway entries in the Local bank. I have radio based simplex gateways and hotspots. All have different port numbers assigned.


Select your hotspot entry and check the settings. The letter on the end of the Call Sign entry must be in the eigth character position. You can use whatever letter you want if you have several hotspots so you know which one is which.

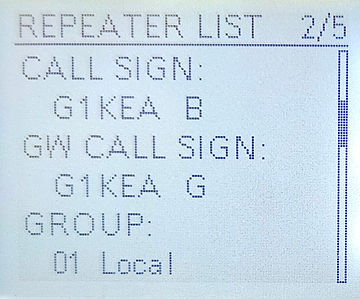
You must have Duplex set to either DUP+ or DUP- with a frequecy offset of 0.000.000 unless you are using the duplex board then you must ensure you have the correct offset and shift in.
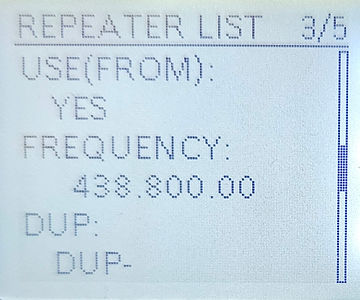

There is no need to have the position in for a hotspot, these are in as I had copied other entries. Position is used for the Near Repeater feature. If you had added your hotpsot using the CS-51 or RT-Systems software there is no need to make any amendments with it, just make them on the radio but remember to save your config settings and copy to your PC for the next time you edit your config file. To edit press the Quick button.


To change a setting scroll to that line and then press the Select button, move left and right with CD or CS button then to delete press V/MHz then RX-CS or DR buttons to change the letter or number. When finished press the Select button.


Keep on scrolling down and correct anything if needed.


When finished select Overwrite and Yes.


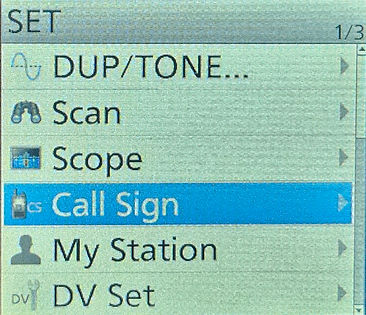
As a final check in DR mode press Menu and then Call Sign or a long press on the CS key will take you to the same screen. You should see each field with an entry in it, this what you should see to successfully access your hotspot.


ID-52
If the hotspot is connected to your network and the services are running, callsign is correct the problem is more than likely with your radio. Below are screen shots from my radio that works with my hotspot. Rather than have text instructions I've uploaded these so you can easily follow them alongside your radio. This first section will look at your licensed callsign that you should have in the radio.


Ensure it is your callsign and not the hotspot callsign with a port letter in the My Call Sign field.


In the next section we will look at the entry for the hotspot.


I store my hotspots and gateway entries in the Local bank. I have radio based simplex gateways and hotspots. All have different port numbers assigned.


Select your hotspot entry and check the settings. The letter on the end of the Call Sign entry must be in the eigth character position. You can use whatever letter you want if you have several hotspots so you know which one is which.


You must have Duplex set to either DUP+ or DUP- with a frequecy offset of 0.000.000 unless you are using the duplex board then you must ensure you have the correct offset and shift in.


There is no need to have the position in for a hotspot the position is used for the Near Repeater feature. If you had added your hotpsot using the CS-52 or RT-Systems software there is no need to make any amendments with it, just make them on the radio but remember to save your config settings and copy to your PC for the next time you edit your config file. To edit press the Quick button.

To change a setting scroll to that line and then press the Select button, move left and right with CD or CS button then to delete press V/MHz then RX-CS or DR buttons to change the letter or number. When finished press the Select button.


When looking at the callsign field it's appearance is misleading as the width of a character is different to that of a space. You can see it better in edit mode as below, I have moved the cursor across to the first space.

Keep on scrolling down and correct anything if needed.


When finished if you have changed anything select Overwrite and Yes.

As a final check in DR mode press Menu and then Call Sign or a long press on the CS key as they will take you to the same screen. You should see each field with an entry in it, this what you should see to successfully access your hotspot.

IC-7100
If the hotspot is connected to your network and the services are running, callsign is correct the problem is more than likely with your radio. Below are screen shots from my radio that works with my hotspot. Rather than have text instructions I've uploaded these so you can easily follow them alongside your radio. This first section will look at your licensed callsign that you should have in the radio.


Ensure it is your callsign and not the hotspot callsign with a port letter in the My Call Sign field.

In the next section we will look at the entry for the hotspot.
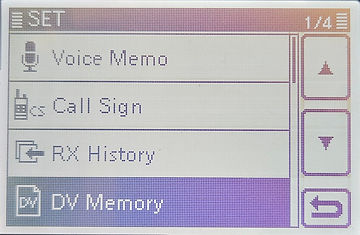

I store my hotspots and gateway entries in the Local bank. I have radio based simplex gateways and hotspots. All have different port numbers assigned.
�


Select your hotspot entry and check the settings. The letter on the end of the Call Sign entry must be in the eigth character position. You can use whatever letter you want if you have several hotspots so you know which one is which.
You must have Duplex set to either DUP+ or DUP- with a frequecy offset of 0.000.000 unless you are using the duplex board then you must ensure you have the correct offset and shift in.


There is no need to have the position in for a hotspot as the position is used for the Near Repeater feature. If you had added your hotpsot using the CS-7100 or RT-Systems software there is no need to make any amendments with it, just make them on the radio but remember to save your config settings and copy to your PC for the next time you edit your config file. To edit touch and hold the screen.
To change a setting touch and hold the field field then use the on-screen keyboard to amend. When finished press the Enter key.


If you have changed any entires when you have finished scroll down until you see screen 4/4.


Select Overwrite to correct the existing entry.


As a final check in DR mode press the CS key to go to the Call Sign screen. You should see each field with an entry in it, this what you should see to successfully access your hotspot.


IC-5100
If the hotspot is connected to your network and the services are running, callsign is correct the problem is more than likely with your radio. Below are screen shots from my radio that works with my hotspot. Rather than have text instructions I've uploaded these so you can easily follow them alongside your radio. This first section will look at your licensed callsign that you should have in the radio.


Ensure it is your callsign and not the hotspot callsign with a port letter in the My Call Sign field. If it is not correct press and hold the screen above the callsign to edit.


In the next section we will look at the entry for the hotspot.


I store my hotspots and gateway entries in the Local bank. I have radio based simplex gateways and hotspots. All have different port numbers assigned.


Select your hotspot entry and check the settings. The letter on the end of the Call Sign entry must be in the eigth character position. You can use whatever letter you want if you have several hotspots so you know which one is which.
You must have Duplex set to either DUP+ or DUP- with a frequecy offset of 0.000.000 unless you are using the duplex board then you must ensure you have the correct offset and shift in.


There is no need to have the position in for a hotspot the position is used for the Near Repeater feature. If you had added your hotpsot using the CS-52 or RT-Systems software there is no need to make any amendments with it, just make them on the radio but remember to save your config settings and copy to your PC for the next time you edit your config file. To edit press the Quick button.


To change a setting scroll to that line and then press and hold that field to edit. When finished press the Enter key. When looking at the callsign field it's appearance is misleading as the width of a character is different to that of a space. You can see it better in edit mode as below, I have moved the cursor across to the second space.
When looking at the callsign field it's appearance is misleading as the width of a character is different to that of a space. You can see it better in edit mode as below, I have moved the cursor across to the first space.

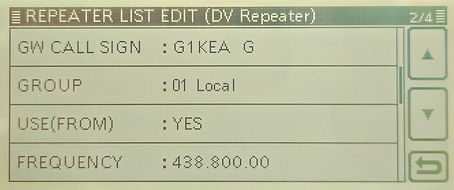
Keep on scrolling down and correct anything if needed.
When finished if yuou have changed anything select Overwrite and Yes.


As a final check in menu screen D-1 press the CS key and you should see each field with an entry in it, this what you should see to successfully access your hotspot.


IC-E2820
IC-E2820 content to follow soon


