DV Gateways
G1KEA D-Star Gateway re-build
The 2m gateway has been running on a couple of radios over the years. It started on a FT-7800R but that radio was then used for a 70cm gateway so it was switched over to a FT-817ND. I then decided to change to a PMR radio and purchased a VHF Motorola GM340.

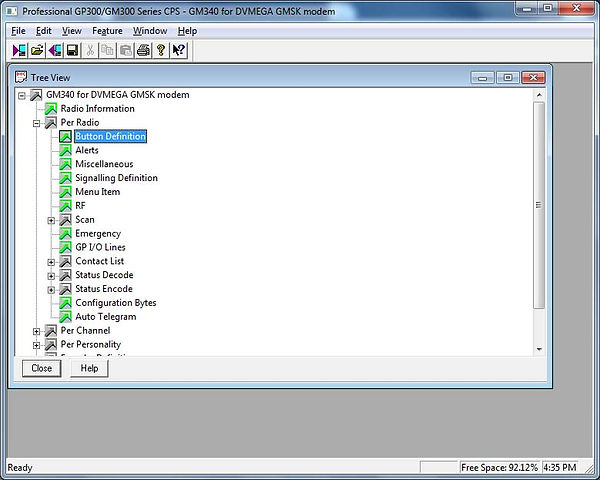
If you have not had your radio pre-programmed for you and you are doing it yourself it is quite easy. Connect your programming lead to your radios microphone socket. Open up the Motorola CPS software then switch the radio on. Click on File then Read Device or the icon to the left of the open file icon to read the current configuration. Expand if necessary Per Radio and then click on Button Definition.

If necessary change any of the button definitions you need to. I have programmed buttons 1 and 2 for the same frequency but at different power levels.

Now close button definition and open Miscellaneous. On the Global tab make sure RX Audio (Accessory Connector) is set to Flat Unsquelched.

Close Per Radio Miscellaneous and open RF. Set your high and low power output.

Close the Per Radio RF and open the GP I/O Lines setting and change pin 3 to Data PTT and Active Level to low.

Close the Per Radio GP I/O Lines and open the Per Channel 1 of 2. On the TX/RX tab enter the TX and RX frequency which will both be the same for your simplex gateway. When selecting your frequency refer to your licence conditions and countries bandplan (RSGB Band Plan) and select a frequency not reserved to licensed gateways (DV Internet Voice Gateway). Select your power level. You can create a second channel like I have with a high power setting should you need it.

Select the PL/DPL tab and make sure the tones are disabled.

Close the Per Channel setting and now open the Per Personallity setting and set as below.

Click on the Squelch tab and set as below.

Click on the Audio tab and make sure the Voice Pre-emphasis/De-emphasis is not enabled.

Once you have made the necessary changes to the settings save to a file. Now upload to your radio by clicking on the icon to the right of the Save icon. Switch the radio off before removing the programming lead.
The next step is to connect your modem to the radio. The GM340 has an unusual connector on the rear panel, unfortunately not a D connector.
I have managed to find plugs for the connector but they are not that cheap. I have more recently found a connector and board for a reasonable price from F5UII.
Initially I found an old 16 way data cable that I could use by removing the clamp that held the ribbon cable in securely. Once this is off be careful that the ribbon cable does not come away from the remainder of the plug.
Cut the ribbon cable refering to the GM340 connector diagram above so you have the leads that you need for the corresponding pins.


I fitted a mini-DIN socket so that I could use the lead supplied with the DV-Mega and still be able to use that lead with my Yaesu radios.
If you are not going to use the other wires in the future should you change to a MMDVM board and want COS and RSSI cut them off neatly.


When pushing the plug in if you use the same as myself the outer four pins of the Accessory Connector get in the way so you will gently need to move these out of the way to allow the plug to fit in.

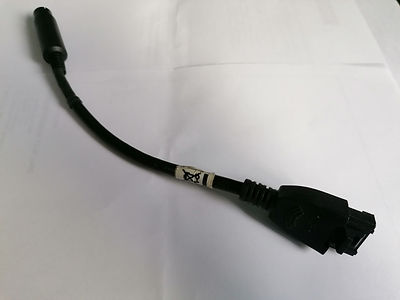
A new interface lead has since been made using a Motorola accessory lead purchased off Ebay.

I wanted to keep the mini-DIN socket for compatibility between the radios and modems.

I'm assuming you will be using Pi-Star which is available for download from here. I will not cover formating an SD card or the download of Pi-Star itself as there is already plenty of information that covers this. Use the Pi-Star Wi-Fi builder tool and then drop the file on to your SD card after writing the image file. When you do start Pi-Star up remember to use your browser and the default address will be pi-star. If you have several Pi's you can change the host name once you are into the configuration screen.
So once in the configuration screen the first thing you will need to do is select the Controller Software. For my personal gateway I have used the DV-Mega GMSK Modem as I am mainly a D-Star user so I needed to select DStarRepeater. This is a simplex gateway so set the Controller Mode to Simplex. Click Apply Changes.
In the General Configuration section change the Host Name from pi-star if you want to. I have as I have several instances of Pi-Star running. Enter your callsign and the frequency you have programmed in to your radio. All of this information is reported out on APRS. Now set your correct latitude and longtitude otherwise your station will be displayed in the English Channel along with a lot of other stations who have not set their co-ordinates. Go in to Google maps and click on your location or one nearby if you do not want your exact location displayed. On a PC at the bottom of the map you will see a small pop-up with the address of the location with your co-ordinates.
When using the DV-Mega GMSK Modem on the Arduino and then connected to the Raspberry Pi select the DV-Mega on Arduino (USB - /devtty/ACM0) -GMSK Modem as Pi-Star does not default to this. Unless your licence permits third party traffic for the Node type select Private, in the UK you will need to apply for a Notice of Variation (NoV) with a gateway callsign to allow public use. If you are using a MMDVM board look at the page for the MK6IKW build.
When complete click on Apply Changes before moving on.

Click on Apply Changes before moving on to the next section. In the D-Star Configuration section select the port number corresponding to the frequency that you have programmed in to the radio, B for 70cms and C for 2m. You can select a default reflector that your gateway will always boot up or revert to but I have this set to manual now for a couple of reasons. Should it be left on a reflector and this then gets busy you can have a problem disconnecting if a reasonable gap is not left. A couple of reflectors are now banning stations from staying connected as there are a limited number of connections allowed. The Firewall Configuration can generally be left alone. When finished click on Apply Changes.

When back to the general Pi-Star screen click on Configuration.

Then click on Expert to enter the advanced configuration.

The warning will be displayed as there are a lot of fields accessible from here that only advanced users should use. Many modifications can be made to the D-Star settings from here.

You will now be in the following screen but obviously with your callsign displayed, do not change anything with these callsigns.

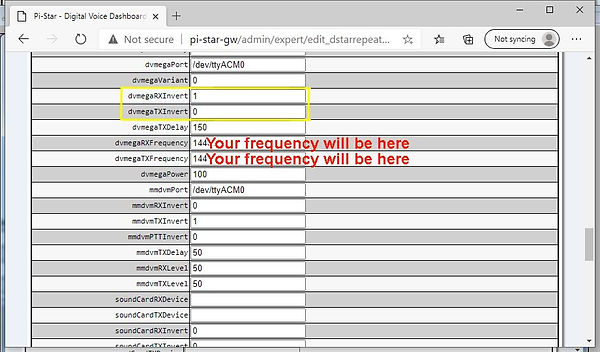
Scroll down the Expert section until you get to the dvmegaPort. For the GM340 you will need to set dvmegaRXInvert to 1 and dvmegaTXInvert to 0. These two settings vary from radio to radio, you may find a GM340 UHF radio will be different.

To complete the changes, scroll to the bottom and click on Apply Changes.

So the radio and Pi-Star are now configured. The next stage is to check the receive and transmit on the D-Star radio.
My DV-Mega when received had both pre-sets in the same position. This worked fine with the Yaesu radios but for the Motorola the transmit output level has had to be dropped by turning the left potentiometer anti-clockwise to the position shown. This may not be the same for every radio depending on how they are set up. More on adjustment later.

D-Star is quite a tolerant mode and not as fussy as DMR to get the levels right on. From the Pi-Star dashboard set the hotspot to REF030C as there is a reasonable amount of traffic on here to listen to.
Program your D-Star radio to your gateway frequency (remember to set duplex with a zero offset) and hopefully you should hear some D-Star traffic, also monitor your Pi-Star dashboard to see when there is traffic but the gateway radio should be going into transmit. If you are not hearing someone speaking switch to FM and check you can hear a data transmission just to check you're wired correctly. Back to DV mode, check you have the dvMegaTXinvert set correctly, if so adjust the TX level on the modem. For the receive side transmit the letter "I" in the eigth character space to request the status of the link. Look at the Pi-Star dashboard and hopefully you will see some local RF Activity at the bottom of the screen displaying your callsign and the gateway will broadcast "Connected to REF030C". If not go back and check the dvMegaRXinvert is set correctly. If it is, slowly adjust the RX level on the modem. When you are happy with this set the eigth character to the letter"E" and when you transmit the gateway will playback your audio. When you are happy with this change to "CQCQCQ" and put a call out on the reflector.
This 2m gateway runs on a Comet CX-725 tri-band antenna at 8m a.g.l.


